Mac 개발환경
Mac은 brew와 같은 CLI 기반의 패키지 관리 도구 덕분에 개발환경을 구축하기 편합니다. 여기에 iCloud를 사용하면 로컬 환경을 간편하게 클라우드 환경으로 옮겨놓을 수 있습니다.
출발하기
brew 설치
Mac이나 Linux로 개발하다가 Windows 환경을 다시 못돌아가는 이유가 2가지 있는데, 하나는 터미널이고 나머지 하나가 패키지 관리자입니다. 터미널은 Windows에서 PowerShell을 지원하면서맘에는 안들지만 어느 정도 해결은 되었는데, Windows에선 아직 쓸만한 패키지 관리자를 보진 못했습니다.

레드햇 리눅스에서는 rpm에서 업그레이드 된 yum을 사용하고, 데비안 계열의 우분투 리눅스에서는 dpkg에서 업그레이드 된 apt를 사용합니다. 리눅스에서는 port와 brew 2가지 선택지가 있는데, 둘의 차이는 소스를 직접 빌드하거나 혹은 이미 빌드된 바이너리를 그냥 받느냐입니다. yum, apt와 마찬가지고 그냥 바이너리를 다운받는 brew가 빠르고 더 편리합니다.
$ /bin/bash -c "$(curl -fsSL https://raw.githubusercontent.com/Homebrew/install/master/install.sh)"zsh 환경 구축
Mac은 Catalina 이후로 기본쉘이 bash에서 zsh로 변경1 되었습니다. 뭐 이것 때문은 아니라도 zsh이 bash 보다 UI, 편의성 면에서 더 좋기 때문에 첨부터 zsh로 사용하는 것도 좋을 듯 합니다.
- zsh 설치
brew install zsh - oh-my-zsh 설치
sh -c "$(curl -fsSL https://raw.github.com/robbyrussell/oh-my-zsh/master/tools/install.sh)" .zshrc설정 (뒤에 후술할 nvm, rbenv 등 모든 정보 포함)# If you come from bash you might have to change your $PATH. export PATH=$HOME/bin:/usr/local/bin:$PATH # Path to your oh-my-zsh installation. export ZSH="/Users/user/.oh-my-zsh" # Set name of the theme to load --- if set to "random", it will # load a random theme each time oh-my-zsh is loaded, in which case, # to know which specific one was loaded, run: echo $RANDOM_THEME # See https://github.com/robbyrussell/oh-my-zsh/wiki/Themes ZSH_THEME="robbyrussell" # Set list of themes to pick from when loading at random # Setting this variable when ZSH_THEME=random will cause zsh to load # a theme from this variable instead of looking in ~/.oh-my-zsh/themes/ # If set to an empty array, this variable will have no effect. # ZSH_THEME_RANDOM_CANDIDATES=( "robbyrussell" "agnoster" ) # Uncomment the following line to use case-sensitive completion. # CASE_SENSITIVE="true" # Uncomment the following line to use hyphen-insensitive completion. # Case-sensitive completion must be off. _ and - will be interchangeable. # HYPHEN_INSENSITIVE="true" # Uncomment the following line to disable bi-weekly auto-update checks. # DISABLE_AUTO_UPDATE="true" # Uncomment the following line to automatically update without prompting. # DISABLE_UPDATE_PROMPT="true" # Uncomment the following line to change how often to auto-update (in days). # export UPDATE_ZSH_DAYS=13 # Uncomment the following line if pasting URLs and other text is messed up. # DISABLE_MAGIC_FUNCTIONS=true # Uncomment the following line to disable colors in ls. # DISABLE_LS_COLORS="true" # Uncomment the following line to disable auto-setting terminal title. # DISABLE_AUTO_TITLE="true" # Uncomment the following line to enable command auto-correction. # ENABLE_CORRECTION="true" # Uncomment the following line to display red dots whilst waiting for completion. # COMPLETION_WAITING_DOTS="true" # Uncomment the following line if you want to disable marking untracked files # under VCS as dirty. This makes repository status check for large repositories # much, much faster. # DISABLE_UNTRACKED_FILES_DIRTY="true" # Uncomment the following line if you want to change the command execution time # stamp shown in the history command output. # You can set one of the optional three formats: # "mm/dd/yyyy"|"dd.mm.yyyy"|"yyyy-mm-dd" # or set a custom format using the strftime function format specifications, # see 'man strftime' for details. # HIST_STAMPS="mm/dd/yyyy" # Would you like to use another custom folder than $ZSH/custom? # ZSH_CUSTOM=/path/to/new-custom-folder # Which plugins would you like to load? # Standard plugins can be found in ~/.oh-my-zsh/plugins/* # Custom plugins may be added to ~/.oh-my-zsh/custom/plugins/ # Example format: plugins=(rails git textmate ruby lighthouse) # Add wisely, as too many plugins slow down shell startup. plugins=(git) source $ZSH/oh-my-zsh.sh # User configuration # export MANPATH="/usr/local/man:$MANPATH" # You may need to manually set your language environment # export LANG=en_US.UTF-8 # Preferred editor for local and remote sessions # if [[ -n $SSH_CONNECTION ]]; then # export EDITOR='vim' # else # export EDITOR='mvim' # fi # Compilation flags # export ARCHFLAGS="-arch x86_64" # Set personal aliases, overriding those provided by oh-my-zsh libs, # plugins, and themes. Aliases can be placed here, though oh-my-zsh # users are encouraged to define aliases within the ZSH_CUSTOM folder. # For a full list of active aliases, run `alias`. # # Example aliases # alias zshconfig="mate ~/.zshrc" # alias ohmyzsh="mate ~/.oh-my-zsh" alias tree='tree -CNFh --du' # Archey if [ -f "/usr/local/bin/archey" ]; then archey -c -o fi export PATH="/usr/local/sbin:$PATH" # Java Version Environment if which jenv > /dev/null; then eval "$(jenv init -)"; fi # Python Environment eval "$(pyenv init -)" eval "$(pyenv virtualenv-init -)" # Node Version Manager export NVM_DIR="$HOME/.nvm" [ -s "/usr/local/opt/nvm/nvm.sh" ] && . "/usr/local/opt/nvm/nvm.sh" # This loads nvm [ -s "/usr/local/opt/nvm/etc/bash_completion.d/nvm" ] && . "/usr/local/opt/nvm/etc/bash_completion.d/nvm" # This loads nvm bash_completion # Ruby Version Manager [[ -d ~/.rbenv ]] && \ export PATH=${HOME}/.rbenv/bin:${PATH} && \ eval "$(rbenv init -)"
개발 환경
나는 Java 백엔드 개발자이고 취미로 하는 코딩은 Python을 사용합니다. NodeJS와 Ruby의 경우에는 오픈소스 라이브러리들이 종종 필요로 하기 때문에 설치합니다. 둘 다 brew로 직접 설치해도 무방한데, 가끔 호환성 문제와 같이 특정 버전을 요구하는 경우가 있어 version manager 형태로 설치하는게 좋습니다.
Java
Java는 크게 두 가지 방법으로 설치합니다. brew를 이용하면 Open JDK를 설치하고, Oracle JDK를 설치하려면 다운로드 후 설치합니다.
- Open JDK 설치
$ brew cask install java - jenv 설치
$ brew install jenv .zshrc설정 추가# Java Version Environment if which jenv > /dev/null; then eval "$(jenv init -)"; fi- 코드 반영
$ source ~/.zshrc
Python
- python, pyenv2 설치
$ brew install python pyenv .zshrc설정 추가# Python Environment eval "$(pyenv init -)" eval "$(pyenv virtualenv-init -)"- 코드 반영
$ source ~/.zshrc
NodeJS
- nvm3 설치
$ brew install nvm .zshrc설정 추가# Node Version Manager export NVM_DIR="$HOME/.nvm" [ -s "/usr/local/opt/nvm/nvm.sh" ] && . "/usr/local/opt/nvm/nvm.sh" # This loads nvm [ -s "/usr/local/opt/nvm/etc/bash_completion.d/nvm" ] && . "/usr/local/opt/nvm/etc/bash_completion.d/nvm" # This loads nvm bash_completion- 코드 반영
$ source ~/.zshrc
Ruby
- rbenv4 설치
$ brew install rbenv ruby-build .zshrc설정 추가# Ruby Version Manager [[ -d ~/.rbenv ]] && \ export PATH=${HOME}/.rbenv/bin:${PATH} && \ eval "$(rbenv init -)"- 코드 반영
$ source ~/.zshrc - 최신 ruby 버전 확인 & 설치
$ rbenv install -l $ rbenv install 2.7.1 - 설치된 ruby 시스템 전역 사용
$ rbenv global 2.7.1
클라우드
여기까지는 보통 일반적으로 하는 개발환경 설정이었습니다. 클라우드 설정은 여러 장비의 설정을 동일하게 유지하기 위해 내가 사용하고 있는 방법입니다. Mac에서 제공하는 iCloud의 매끄러운 동기화 기능을 사용합니다.
iCloud 저장소 설정
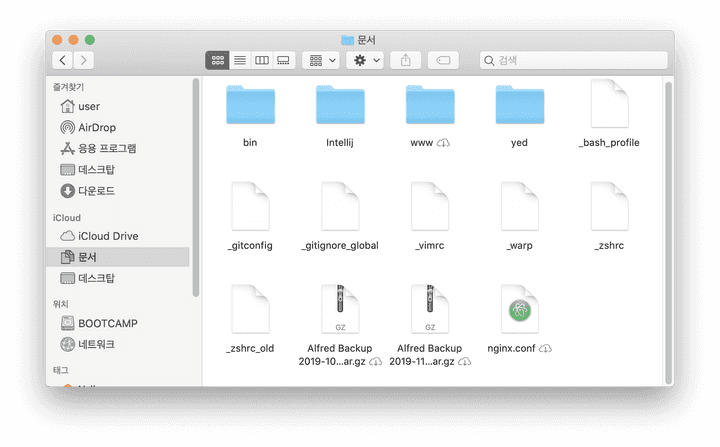
기본적으로 Desktop, Document는 동기화 설정이 되어 있습니다.5 그래서 나는 Document를 사용하기로 마음을 먹었습니다. 가장 많이 사용하는 .bash_profile, .gitconfig, .zshrc 같은 설정 파일들과 $HOME/bin 디렉토리를 생성합니다.

dot(.)으로 시작하는 파일들의 경우 Mac에서도 숨겨지기 때문에 일부러 underscore(_) 사용해서 파일을 생성했습니다.
로컬 파일 symbolic link 생성

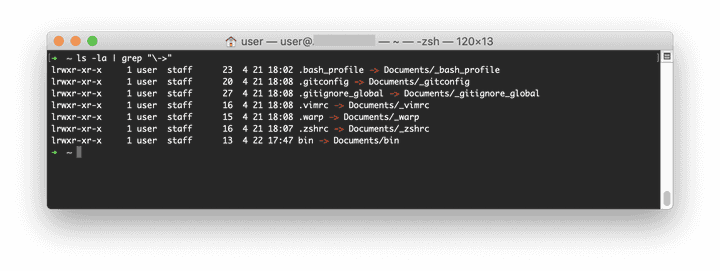
$HOME/Documents 생성한 파일 및 디렉토리를 symbolic link로 설정합니다. 이렇게 하면 새로운 장비를 세팅해도 iCloud만 설정하면 동일한 설정 파일을 유지할 수 있습니다.
$ ln -s ~/Documents/_bash_profile ~/.bash_profile
$ ln -s ~/Documents/_git_config ~/.git_config
$ ln -s ~/Documents/_gitignore_global ~/.gitignore_global
$ ln -s ~/Documents/_vimrc ~/.vimrc
$ ln -s ~/Documents/_zshrc ~/.zshrc
$ ln -s ~/Documents/bin ~/bin
기타 환경
Archery
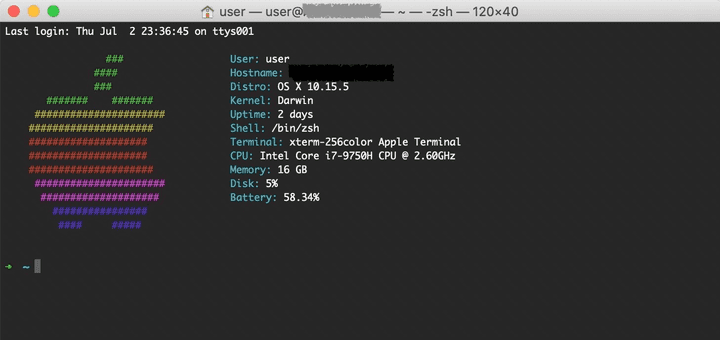
OSX archey는 Mac 환경 정보를 Text UI 형태로 표시해 줍니다. 터미널을 실행했을 때 나오는 사과모양이 맘에 들어 사용 중입니다.
- archey 설치
$ brew install archey .zshrc설정 추가# Archey if [ -f "/usr/local/bin/archey" ]; then archey -c -o fi- 코드 반영
$ source ~/.zshrc